Bravely Bohemian Favorites

Breathe Deep, Be Brave

  • Fashion
    • Trends
    • Wedding
    • Steampunk
  • Adventuring
    • History
  • DIY
    • Home Decorating
    • Crafting
    • Cooking
  • Spirit
  • Wellness
    • Pets
  • Reviews
    • Books
    • Media
    • Products
  • Shop
    • Gift Guides
  • About
  • Join Us!
  • Contact Us!

More Boho Valentine Cards to Make

by BravelyBohemian

February is the perfect time to express your love by making your own boho Valentine cards. There’s something extra special about receiving a handmade card from someone you love. The following are 6 bohemian-themed cards I made to inspire you to get your own boho crafting spirit in gear for Valentine’s Day.

DIY Boho Valentine Cards

Love Forever Boho Valentine Card
DIY Boho Valentine Cards_Love Forever

For this first boho Valentine, I found some great bohemian themed scrapbooking papers from Colorbok that easily mixed and matched. Colorbok makes a lot of coordinating double-sided papers. I used one printed paper for the background of the card, then added two vertical strips of paper in coordinating prints. I then rubber stamped the “Love” and “Forever” designs in black on white cardstock. I framed these with additional printed paper from the scrapbooking pack. After assembling the card, I topped it off with two gold printed on wood leaf embellishments. I really like how the muted papers look together combined with the boldness of the stamped images.

Love Grows Boho Valentine Card
Love_Grows_Boho_Valentine_Cards

One of my husband’s favorite bohemian hobbies is to take a nap under a tree, especially if that tree happens to be in a famous location such as a historical site. There’s something very romantic about hanging out under big trees. Even more so if there is a swing or two to sit on.

For this card, I used a pink polka dot scrapbook paper for the backing of the card. I stamped the tree in pigment ink on pale yellow cardstock and then embossed the image with dark blue embossing powder. I framed the image with matching blue cardstock behind the image, then attached it to the polka dots. I added a row of pre-cut floral and dotted paper pennants by Me and My Big Ideas, attaching them to the card with 3-dimensional tape. I also added jute twine knotted at each end to connect the pennants together. To complete the card, I added two tiny hearts to the swing.

This is one of my favorite boho Valentine cards. It makes me smile whenever I look at it.

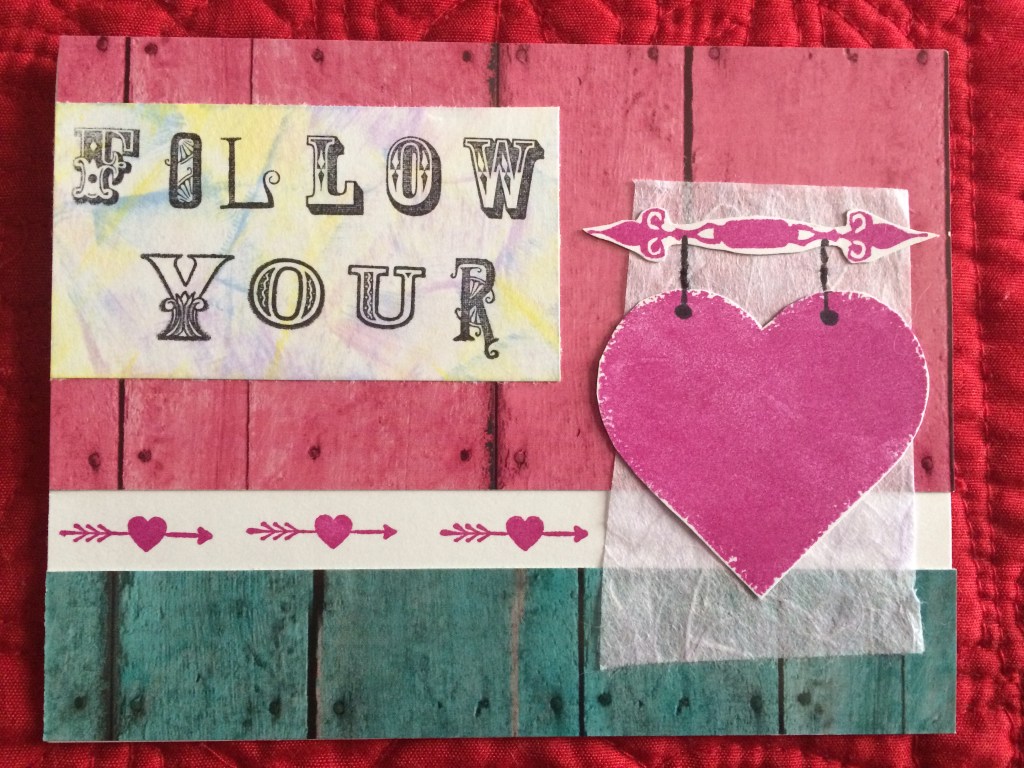
You Are So Lovely Boho Valentine Card
DIY Boho Valentine Cards_You Are So Lovely

I picked up a scrapbook pack of paisley papers recently. Paisleys make me so happy. I wanted this card to be boldly bohemian. First, I split a piece of mostly black and white paisley paper in half, leaving the middle of the white cardstock showing. I found this great wood dream catcher to use as the centerpiece of the card. Next, I layered several red and hot pink silk flowers together with a silver brad and added the embellishment to the card. Finally, I added a sticker that says “You Are So Lovely” to the bottom left side.

I like the way this card came together. The bright flowers give the card almost a Mexican flare (maybe I was channeling Frida Kahlo since I saw a big exhibit of hers in Florida last year?) and I love all of the dimension in the card.

Very Boho Elephants Valentine Card
DIY Boho Valentine cards_Very_Boho_Elephants

Speaking of working in dimensions, this is my “go big or go home” bohemian valentine. I have a massive wall of ribbons and trims hanging in my art studio. I consider it my wall of possibilities because there are so many choices to use in my artwork. I have caught myself staring at recently acquired pompom trims sitting on the wall just waiting for the right opportunity to come along to use them.

I started the card by die cutting the elephants, flowers, and hearts. I found the elephant and flower scrapbooking dies at AliExpress.com and had them shipped in from China. It takes about a month for the scrapbook dies to arrive, so remember to place your orders well in advance of holiday crafting. I then cut all of the trims- 2 hot pink pom poms, 2 yellow pom poms, 2 turquoise pom poms, 2 bright green lace, and one hot pink grosgrain ribbon. Remember to cut your ribbons slightly longer than your card length. Arrange and adhere to the white cardstock, trimming the ribbons to fit. Lastly, I attached the die cuts. I used 3-dimensional tape on the elephants and hearts to give the card a little extra pizzazz.

The Very Boho Elephant valentine card is really bright and a bit crazy for my personality, but there’s also something fun and 1970s about it. It kind of reminds me of our childhood, when my sister decided to decorate her room in purple shag with pompom trim. It sounds hideous, but it was a pretty cool place to hang at the time.

Southwestern Hearts Boho Valentine Card
DIY Boho Valentine Cards_Southwestern_Hearts

I love this Southwestern-themed boho valentine card. Sizzix has come out with a leather jewelry cutting system called the Big Shot Jewelry Studio which I can’t wait to play with. I ordered the Sizzix Southwestern pattern Thinlets Die (#661510) to start.

I used the Sizzix die to cut two out in dark red paper and adhered those to white cardstock. I decorated the center area of the card with Southwestern- themed ribbon. I then found 2 chipboard hearts and embossed them with several layers of bright gold embossing powder. I saved the red punches that fell out when I ran the Southwestern die through my Sizzix Big Shot and added them to the fronts of the gold hearts. I then die cut the love arrow (another scrapbooking die I found at AliExpress.com) and attached it to a black arrow. I then assembled the pieces to the card.

My Heart Soars Boho Valentine Card
DIY boho Valentine cards_My Heart Soars

I am a sucker for picking up vintage-themed rubber stamps and love using them in boho valentine cards. Maybe it’s the steampunk gal in me? Hot air ballooning goes back as far as the 1700s and has always been a bohemian pastime- romantic and dangerous at the same time. So I had fun making this card, though I have yet to get the hubby up in a balloon. Maybe this year?

This card uses 2 different patterned scrapbook papers cut corner to corner. I used a blue polka dot combined with a red and white patterned paper. After attaching the papers to the cardstock, I then ran gold and black arrow ribbon down the angle of the card. Remember to cut your ribbons slightly longer than the card so you have room to adjust the ribbon, then trim it after adhering to the card. I then used Tim Holtz Fired Brick Red ink to stamp the balloon and cut it out. I found brick red paper to attach the balloon to and then cut out the background frame about ¼ inch larger than the balloon image.

Next, I designed the text, “My heart soars when I am with you” on Canva.com, saved as a .pdf and printed it out in black. (Oops! The first time, my printer fit the image to the page, so I ended up with my quote being sign-sized. Check your printer settings to make sure it prints out 2 x 2 ½ “ or whatever size you prefer.) I trimmed the quote and then mounted it on brick red paper. I attached everything to the card, making sure to give the hot air balloon a nice lilting look as though the wind is taking it on an adventure.

I hope these boho valentine cards inspire you to craft your own cards for the people you love. For further inspiration, click here to see the boho valentine cards I made last year.

Happy boho crafting!


Share this:

  • Click to share on Facebook (Opens in new window) Facebook
  • Click to share on X (Opens in new window) X
  • Click to share on Pinterest (Opens in new window) Pinterest
  • Click to share on LinkedIn (Opens in new window) LinkedIn

Filed Under: Crafting, DIY Tagged With: Crafting, DIY, Papercrafting, Valentine's Day

Velvet Throw Blanket Love! Add Super Soft Plush Blankets to Cozy Up Your Boho Décor

by BravelyBohemian

Plush_Throw_Blanket_DIY_Joann_Sew_Lush

It’s Velvet throw blanket time of year! With winter weather fast approaching, it’s time to cozy up and stay warm.

Velvet throw blankets are one of my absolute favorite items. Throws add comfort and a cozy feel to any living space. We’ve been busy redecorating our living room in shades of gray, adding in select bohemian décor to make the room pop. Shopping around, I haven’t found the perfect throw blankets yet- the kind that says, “Take me home!,” so I decided to make some on my own.

Jo-Ann Fabrics is having some amazing sales lately on all of their Fall/Winter plush fabrics. I immediately fell in love with Jo-Ann’s Sew Lush line of fabrics. Sew Lush is by far their softest line of velvet plush fabrics and it comes in over 40 colors and prints. Sew Lush solids are around $12.99 a yard and prints are around $14.99, though they are often on sale or you can use a coupon to reduce the cost of your purchase.

For my velvet throw blanket project, I chose the Navy Geometrics pattern. I like the boho design of this fabric. The fabric comes in a 57 inch width, so I purchased 2 yards for each blanket. To start, I trimmed about one-half inch off the raw selvage edge. I used regular white Coats & Clark thread, but definitely suggest putting a medium weight ballpoint needle in your machine. Ballpoints are best used when stitching knit or other stretchy, performance fabrics.

DIY_velvet_throw_blankets_Sew_Lush_from_JoAnn

I began by sewing the long lengths of the blankets first. You can pin ahead if you like, but I found it just as easy to create a rolled hem as I sewed. I turned under about one-quarter inch of the fabric edge, then turned the hem a second time to hide the raw edge. I used a medium width large zigzag stitch that easily caught the raw edge underneath. I noticed that my commercially made plush throws only rolled the hem under once, but I decided I liked the cleaner look of the double rolled hem and hope that it will prevent the blankets from letting off excess lint.

As with any new fabric, remember to wash your blankets after you craft them to get rid of any unhealthy chemical finishes that are on the fabric. (You can also wash them before.) Washing should also help cut down on the lint coming off the plush.

Boho_Throw_Blanket_How-to

And like any project in our house, I had help. This is Squee, our newest rescue cat. Squee is our household’s quality control expert and confirmed the Sew Lush fabric was indeed super velvety soft and cozy. He was parked on the fabric before I even started sewing. I have a feeling that we are going to be arguing over whose blankets these are in the coming days!

Happy Boho Crafting!


Share this:

  • Click to share on Facebook (Opens in new window) Facebook
  • Click to share on X (Opens in new window) X
  • Click to share on Pinterest (Opens in new window) Pinterest
  • Click to share on LinkedIn (Opens in new window) LinkedIn

Filed Under: Crafting, DIY, Home Decorating, Products, Reviews Tagged With: Crafting, DIY, Home Decorating, Reviews, Sewing

The Locker Hooking Experiment- Boho Fiber Crafting Fun

by BravelyBohemian

Hello boho crafty friends! Question for you…Have you ever heard of Locker Hooking? (Insert funny, off-base comments from my husband here!)

I was a child of the 80s, so every kid I knew who was remotely crafty had to go through a creative rite of passage: Receiving latch hook kits for Birthdays and Holidays. And making goofy pillows in middle school Home Economics class. (My pillow was an apple with a worm coming out of it and my sister’s pillow was a turtle. I think we both also completed horse latch hook kits).

Locker Hooking Black & Gray Grid Pillow

I have to be in the mood to work on hand stitching projects because, at times, I still find them a little tedious. I also really have to pay attention if I am knitting so I don’t drop stitches and have to take out numerous rows. So I recently found a fun craft that is in between- not quite as slow as latch hooking but easy to fix in a hurry, unlike most knitting screw-ups.
Introducing Locker Hooking!

About Locker Hooking

Locker Hooking is a continuous rug hooking technique that uses latch hook rug canvas and fibers such as yarn, string, and narrow fabric strips. A locker hooking tool has both a crochet end and a needle end. You simply use the crochet hook end of the tool to pull your yarn or fabric up through the latch hook canvas holes. Then use the needle end to thread a simple black cotton yarn through the loops to “lock” the loops in place. Click here to get step-by-step locker hooking instructions.

According to Theresa Pulido, author of the books, Hook, Loop & Lock, and Locking Loops, locker hooking originated in England in the early 1900s where wool yarn was used to create rugs. Some Americans took up locker hooking in the 1940s, but it never became a widespread craft. More recently, artisans have begun experimenting with fiber techniques and with the help of Lisa’s books and projects, locker hooking is becoming more popular worldwide.

My Locker Hooking Projects

So far, I have completed 3 locker hooking projects so far and I LOVE the art!

1. I started by making a square pillow using dyed sari fabric yarn from India. The yarn is so colorful and I love the texture the fabric makes when it is looped through the latch hook canvas.

Locker Hooked Pillow_Front

2. For my second project, I experimented with multiple colors of bamboo yarn and designed a tribal pattern. The loops of bamboo yarn are super soft (like kittens), but slippery to work with. Because the yarn is super soft, the pattern also came out a bit less structured, but the design is still eye-catching.

Locker Hooked Pillow_Tribal boho design

3. For my third project, I decided to run with a serious pattern. On Pinterest, I noticed people posting cool designs that were created on Grid-Paint.com. I selected one of the patterns pinned on Pinterest, then went onto Grid-Paint.com and doubled the design to make the end result big enough to be a pillow or wall hanging. I then chose black and gray chunky cotton yarn to complete the locker hooking. I love the result! The chunky yarn held the pattern well and this piece adds wow factor to our living room.

Locker Hooking Black & Gray Grid Pillow

To learn more about locker hooking, check out my instructions here. I also suggest you get your hands on Theresa Pulido’s books to give you further locker hooking project ideas. She also sells some great colorful locker hooking kits and supplies on Amazon and her site, ColorCrazy.com. I am also happy to see her cat participating in her instructional videos.

Happy Boho Crafting!


Share this:

  • Click to share on Facebook (Opens in new window) Facebook
  • Click to share on X (Opens in new window) X
  • Click to share on Pinterest (Opens in new window) Pinterest
  • Click to share on LinkedIn (Opens in new window) LinkedIn

Filed Under: Books, Crafting, DIY, Home Decorating Tagged With: Books, Crafting, DIY, fiber crafts, Home Decorating, locker hooking

Locker Hooking- How to Craft Great Bohemian Style for your Home

by BravelyBohemian

Locker hooking is quickly becoming my new favorite pass time, especially if I am sitting in front of the tv (with our Cat, Huffy) and I feel like I should be accomplishing something. Locker hooking is a rug hooking technique that originated in Great Britain and is recently going through a major resurgence. The craft is quick and easy to do. Locker hooking is a fun way to give your home fantastic bohemian style.

Directions to make Locker Hooking Pillow

Here are the directions to get started locker hooking:

Supplies:
Locker hook
rug hooking canvas (the kind also used for latch hooking)
Pencil or marking pen
Yarn, sari fabric strips, ribbon or other fibers
Black cotton yarn
Large eye tapestry needle
Coordinating fabric (to back finished project)
Fiberfill (if making into a pillow)
Needle & thread

Locker Hooking Supplies

Preparing Your Canvas

Start by preparing your latch hook canvas. Decide the final dimensions you would like your project to be. I suggest making a square pillow for your first project. My pillow canvas is 13 x13. So this gives me 51 latch hook canvas holes to work with in each direction.

Next, add on 3 canvas holes to each side of your project. I like to mark these with a pen or pencil so I know where to cut my canvas. I also like to mark the actual boundaries I will be stitching within. If you are stitching a particular design, you will also want to mark the center of the whole project and other select places, such as where your design starts or where you plan to change colors. The markings will all be hidden once you locker hook over that area.

Once you cut your canvas, fold over the extra 3 canvas holes to the back on each side of your project. This will provide reinforcement for your completed project and extra strength if you are attaching a backing to your locker hooking.

Estimating How Much Yarn You Need

There’s nothing worse than starting a project and then realizing you are short on yarn. Yikes! I’ve been there! Take a look at the back of the yarn wrapper. You’ll find a key that will tell you what size needles to use if you are knitting or crocheting and how large the item will knit up on the recommended needle size. And most importantly look at the number of yards in your skein of yarn. All of this data helps you estimate how much yarn you will need to complete your project.

locker hooking using fabric yarn

With locker hooking, it depends on how big you make your loops how much yarn you will use. I make my loops around ¼ inches tall for fabric loops and 1/3 inches for yarn loops. By the inch, I think it’s pretty comparable to the knitting and crochet estimates on the label. To truly check, try locker hooking a few inches with your yarn, then pull out the loops and measure how much you used. From there, figure out how much yarn you would use to locker hook a row and then multiply that number by the number of rows to get the yardage you need for your completed project.

Or, if that’s too much math for you, (as it is for me! Math hurts my brain!), just buy extra yarn. You can always return it to the store or use it in another project. For this pillow, I needed 2 skeins of sari fabric yarn that was sold in 75 yards per skein. (I ended up using 1 ½ skeins).

Starting to Locker Hook

Now we are ready to get started locker hooking!

Thread the needle eye of your locker hook with black cotton yarn. Place your locker hooking yarn under your canvas.

Pick a place to start locker hooking. Some people like to start in the middle of their project and work a swirl pattern outward. My pillow consists of simple rows, all in the same sari fabric yarn. The edges are the most difficult to get through since they are doubled over, so you may want to start in a single canvas area until you get the hang of the stitching.

From the top, push the crochet end of the locker hook down through the hole in the latch hook canvas, and catch the fabric yarn in the crochet hook (you don’t have to do a full loop, just catch it), then pull the fabric up through the hole to make a loop on the front of your canvas. Bring the fabric loop up about ¼ inches. Go to the next hole and repeat.

Locker Hooking Creating the Loops

How to Locker Hook- catching yarn underneath

How to Locker Hook_Make loop

Once you get six or eight loops, you will then pull your locker hook across the top of the canvas through all of the loops, locking the loops in place with your black cotton yarn. Leave a tail of 2 to 3 inches on your yarn, enough to weave in later. Then continue locker hooking more loops and locking them in place.

Locker Hooking How-to_Lock the Loops

When you are working the edges of your project, make sure to bring your loops through both layers of the doubled over canvas. It can be a bit difficult if your folded canvas doesn’t line up perfectly (mine never does), so just carefully finagle your locker hook and your yarn through as best you can. If you tug too hard, you may break the canvas.

Finishing the Edges

Once you get done locker hooking, you will notice the canvas showing on the edges of your project. You will also have yarn ends sticking out all over the place. No worries, we’ll get to those in a moment.

To cover the edges, take your sari yarn and overstitch all the way around your project. On the corners, overstitch twice, once on each side of the corner. This overstitching will give you a nice finished edge and looks really nice if you are making coasters, trivets, placemats, or rugs.

Tying Up Loose Ends

Now it’s time to deal with all your fabric yarn and black cotton yarn ends that, if you are like me, are probably driving you crazy.

Start with your black cotton yarn tails that are sitting on the top side of your project. Thread your large eye tapestry needle with an end piece and then slide the tail into several locker hooked loops (not the same loops the thread is coming out of as that will unlock some of your stitches). Then just clip close any excess yarn.

How to Locker Hook: Weave in yarn tails

How to Locker Hook_Weave and clip yarn tails

Once you have all the black cotton yarn tails woven in, turn your project over to deal with the cotton sari yarn ends. Thread the fabric yarn tail onto your tapestry needle and carefully push the needle and fabric through one of the canvas holes to the front of your project. Then weave the end into the locker hooked loops and clip, just as you just did for the black cotton yarn tails. This process will give the back of your project a clean look and is especially nice if the back of your project is going to stand alone. Cleaning up the back of the project is less important if you are going to be adding a backing such as rug canvas or when making a pillow. However, finishing all ends will further lock in your loops on the front and keep them from slipping when your project is in use.

How to Locker Hook_Weaving in Yarn Tails

Displaying Your Completed Project

The back of your completed locker hooking project usually looks as cool as the front, so for some projects such as coasters, table runners and placemats you will probably want to leave the back as is. For rugs, you may want to add rug canvas or non-slip strips to the back. If you’d like to hang your locker hooked project on the wall, it may look nice hung from a branch or driftwood.

Here’s an example of what the completed back looks like on my project:
Back of Locker Hooking Project

If you want to make a pillow out of your project, cut out fabric that is 1 inch larger than the completed locker hooked area. Folder under the fabric 1/2 inch and then 1/2 inch again and press so that the right side of the fabric is facing out. Then carefully stitch the fabric onto the back of the locker hooked area. Leave enough room open to stuff the pillow with fiberfill, then continue to stitch shut.

Locker Hooked Pillow_Front

And that’s it! Locker hooking is an endlessly fun, easy and creative way to use yarn and other fibers in your boho crafting. What a great way to add happy pieces to your bohemian style! For more project ideas check out Theresa Pulido’s books on modern locker hooking and follow her on Pinterest. Plus check back here for my next projects.

Happy boho crafting!

Share this:

  • Click to share on Facebook (Opens in new window) Facebook
  • Click to share on X (Opens in new window) X
  • Click to share on Pinterest (Opens in new window) Pinterest
  • Click to share on LinkedIn (Opens in new window) LinkedIn

Filed Under: Crafting, Home Decorating Tagged With: Crafting, DIY, fiber crafts, Home Decorating, locker hooking

Make These Easy BOHO Valentine’s Day Cards

by BravelyBohemian

DIY Boho Valentine's Day cards

Making Valentine’s Day cards always brings cheer to cold Northern winters. It reminds me of getting ready for Valentine’s Day parties at school when I was a kid. This year, I based my cards on Boho décor that seems to be in every store. Hearts, arrows, feathers, natural materials, banners and thoughtful script sayings all inspired these cards. Take a look and enjoy:

Follow Your Heart Valentine’s Day Card
Bohemian Valentine's Day cards-Follow Your Heart

I found some great wood plank background paper that I used in 2 colors to form that background of the card. I brushed pastel inks onto white cardstock and then stamped “Follow Your” in black script over the top and cut into a rectangle. On white paper, I stamped the rustic heart and post in hot pink and cut out. I mounted that on a piece of lavender rice paper and mounted to the card. Lastly, I stamped the horizontal row of heart arrows in hot pink to finish off the card.

Let’s Ride in Tandem Love Card
Bohemian Valentine's Day cards-Let's Ride in Tandem

I think I got this tandem bike stamp at Michael’s last year. I just love it! I stamped the image in navy blue on white cardstock, cut it into a rectangle and then framed the bike with mulberry purple paper. I then mounted this onto navy paper that runs the horizontal length of the main card. Next, I stamped the bottom length of the card in a mulberry fleur de lis pattern. At the top, I stamped the LOVE banner letters in 4 different shades- mulberry, aqua, magenta, and navy. These stamps also came from Michael’s Recollections collection. The letters were cut out, then mounted onto aqua ribbon with dimensional tape and attached to the white card. To finish off the card, I attached the metal heart next to the bicycle.

Arrows and Feathers Valentine’s Day Card
Bohemian Valentine's Day cards-Arrows and Feathers

I like to think out of the box when creating holiday cards. Valentine’s Day cards don’t have to be red, white, and pink! I recently found this funky boho paper collection. I like the mottled purple background, which is mounted onto white cardstock. I cut a matching band of paper in gold and added wooden arrows to give the card extra dimension. Next, I cut the heart and feathers using paper punches and attached them to the card. I really like the bohemian look of the striped feathers and the horizontal movement of the card. The colors and style make this a perfect card for a man.

Brave Heart Valentine’s Day Card
Bohemian Handmade Valentine's Day cards-Brave Heart

In this card, I used additional papers from the boho collection I used in the Arrow and Feathers Card above. I used the red and orange tribal paper for the background of the card, mounted onto white cardstock. Next, I stamped the “Brave Heart” script onto white cardstock, cut it into a rectangle and then framed it with blue floral paper. The 3 blue and white circles were cut out using a round paper punch. The navy arrows and heart were cut out using my Sizzix Big Shot machine. This card is one of my favorites. I like the masculine card colors and design.

LOVE Burlap Valentine’s Day Card
Handmade Bohemian Valentine's Day cards_Love Burlap card

I love using texture and dimension in my artwork, so this card uses bright pink burlap mounted on white cardstock. The heart, arrows, LOVE and white swirl design were all cut on my Sizzix machine and then gently mounted onto the burlap to give it a collage look. I finished off the look by adding a dimensional red felt puffy heart and silver metal heart.

I hope my out-of-the-box bohemian Valentine’s Day cards inspire you to design your own unique papercraft looks! For more ideas, take a look at these additional boho Valentine’s Day cards.

Happy Boho Crafting!

DIY Boho Valentine's Day cards

Share this:

  • Click to share on Facebook (Opens in new window) Facebook
  • Click to share on X (Opens in new window) X
  • Click to share on Pinterest (Opens in new window) Pinterest
  • Click to share on LinkedIn (Opens in new window) LinkedIn

Filed Under: Crafting, DIY Tagged With: Crafting, DIY, Papercrafting, Valentine's Day

  • « Previous Page
  • 1
  • 2
  • 3
  • 4
  • 5
  • Next Page »

Meet Karen…

https://bravelybohemian.com/meet-karen
Wife, Crazy Cat Lady, Museum Junkie, History Buff, Entrepreneur, Crafter, Collector, Book Enthusiast, Project Runway Addict, Holistic Gypsy, Adventurer, Steampunker, Literal Tree Hugger and All-Around Fun Gal

Disclosure: This blog uses affiliate links, meaning we earn a small compensation when you purchase from our links. Your purchase helps keep the blog running, plus the cats fed and off the desk long enough to deliver you new content.

Get Bravely Bohemian!

Never miss a new post or opportunity to be more Bravely Bohemian!! We’ll even send you some FREE Boho goodies! Subcribe Here:

Connect with Us!

  • View BravelyBohemian’s profile on Facebook
  • View BravelyBohemian’s profile on Twitter
  • View BravelyBohemian’s profile on Pinterest
  • View karen-mcmahon-4a92a411b’s profile on LinkedIn

Trending Boho Topics

Shop Our Favorite Brands:

300x300 general
Plow & Hearth
CLICK.BUY. CREATE. Shop Michaels.com today!

Copyright © 2025 · Lifestyle Pro Theme on Genesis Framework · WordPress · Log in


Loading Comments...