Bravely Bohemian Favorites

Breathe Deep, Be Brave

  • Fashion
    • Trends
    • Wedding
    • Steampunk
  • Adventuring
    • History
  • DIY
    • Home Decorating
    • Crafting
    • Cooking
  • Spirit
  • Wellness
    • Pets
  • Reviews
    • Books
    • Media
    • Products
  • Shop
    • Gift Guides
  • About
  • Join Us!
  • Contact Us!

Make Easy DIY Christmas Garlands with Felt and Wood Beads

by BravelyBohemian

Today I am going to share with you how to make these easy DIY Christmas garlands.

Felt Christmas Garlands with Beads DIY

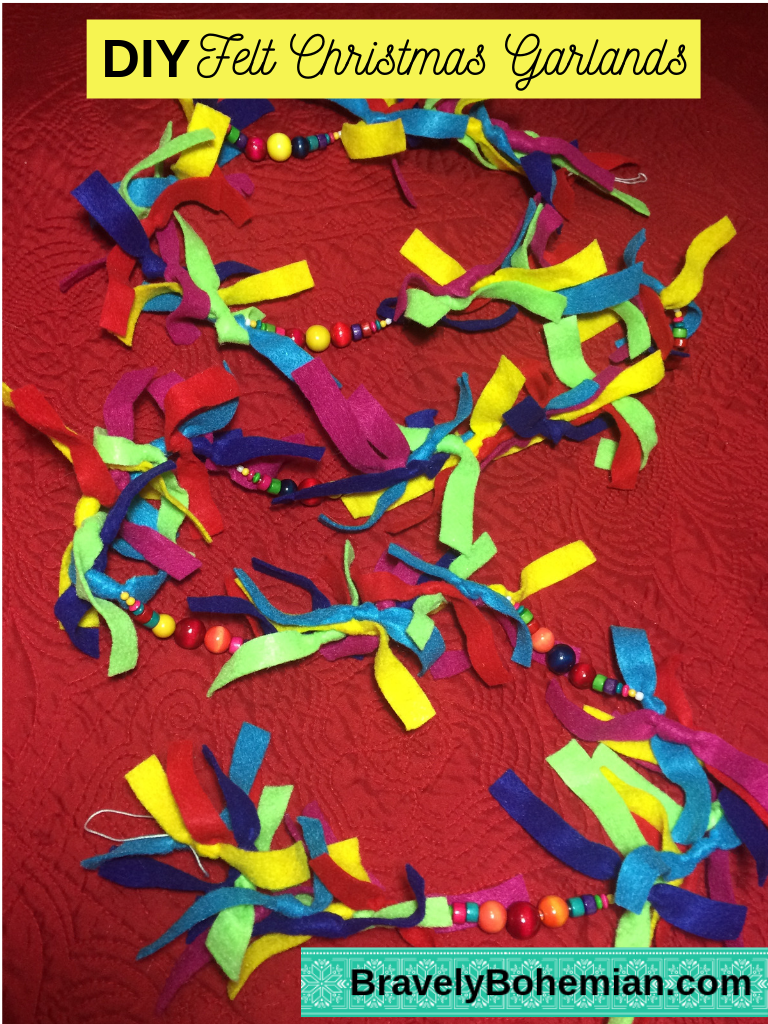
The garlands are made out of strips of felt and wood beads. I made 7 strands to string on our Christmas tree, each 6 feet long. To tie the look together, you may want to make additional garlands to add to your tabletops and banisters. Intertwining with greens and white lights make your DIY Christmas garlands extra festive.

Every few years I pick a new theme for our Christmas tree. I decided our tree had to be bohemian and colorful. As you know from my previous post, I selected some vintage ornaments we inherited from my mother-in-law and mixed them with handmade ornaments, plus some store bought ornaments. However, I really wanted to pull the look all together. The DIY Christmas garlands created the perfect balance on our tree.

Boho Christmas_DIY Christmas Garlands

Here’s what you need to make your own DIY Christmas garlands.

Supplies:

*String or multi-colored baker’s twine, 6 feet plus 4 inches per garland
*Felt in 6 colors, ½ yard each
*Colored wood beads in assorted sizes and colors
*Beading needle
*Sharp fabric scissors


Directions:

1. For each garland, cut your string or baker’s twine approximately 6 feet, 4 inches. Make a loop on the one end of your string and then tie a double knot. You will want approximately a 2-inch loop on the end of your garland.

2. Next, cut strips out of your 6 colors of felt. I made my felt strips approximately ¾ inch wide by 6 inches.

3. Now simply overhand knot the felt strips onto your string, alternating colors. In my garlands, I tied the 6 colors on in random order, then another 6 in random order for a total of 12 felt strips.

4. To break up the felt sections, add about 3 inches of assorted wood beads to the garland. Use a large-eye needle if necessary to string the beads.

Bohemian Christmas DIY Christmas Garlands

*I found colorful beads to match my colors of felt. However, you can also buy unfinished wood beads, and then paint them with acrylic paints.

5. Continue alternately tying sections of felt strips and beads until you get close to the end of your garland, ending with a section of felt strips.

6. To complete the garland, tie the remaining open end of your garland string into a loop and knot it as you did in Step One.

Have fun decorating with your festive DIY Christmas garlands! Click here to see our next boho Christmas decorating project, Mixed Media Tart Tin Ornaments.


Share this:

  • Click to share on Facebook (Opens in new window) Facebook
  • Click to share on X (Opens in new window) X
  • Click to share on Pinterest (Opens in new window) Pinterest
  • Click to share on LinkedIn (Opens in new window) LinkedIn

Filed Under: Crafting, DIY, Home Decorating Tagged With: Christmas, Crafting, DIY, Felt, fiber crafts, Holidays, Home Decor, Home Decorating

Tips on Collecting and Using Vintage Christmas Ornaments

by BravelyBohemian

Christmas is a great time to surround yourself with bohemian style. Mixing vintage Christmas ornaments into your favorite Holiday decor is a great way to get a beautiful, eclectic look that will wow you and your guests.

Vintage Christmas Ornaments

I love collecting and using vintage Christmas ornaments in our Holiday décor. Vintage ornaments remind me of decorating our Christmas tree as a kid. We always decorated our tree on Christmas Eve and then left it up through the New Year until Little Christmas. Every ornament had a memory and story attached. It was fun to share our favorites.

Here are some tips on how I go about collecting and using Vintage Christmas ornaments in our décor.

To get a boho Christmas décor look, remember it’s all about being eclectic and colorful. I like to mix vintage ornaments and modern ornaments with ornaments I’ve made. I also mix bright, cheerful ornaments with natural elements.

Review What You Have

Start by looking in your own collection of Holiday décor. Do you have any ornaments you absolutely love and can present in a new way? Do you have any vintage Christmas ornaments in your collection? Also, consider asking older relatives and neighbors if they have any vintage ornaments they are ready to part with. Often, people love to downsize their holiday stuff.

Blown glass vintage Christmas ornament
One of my absolute favorite inherited vintage Christmas ornaments. I love the vibrant color and delicate blown glass.

Collect Year Round

If you want to collect vintage Christmas ornaments, you can often find great stuff year round. You just need to know where to look.

Church and Non-profit rummage sales are my favorite places to find affordable Christmas décor. Garage Sale season is another off-Holiday time to find neat, affordable Holiday decorations. People are often willing to bargain because they just want to get rid of the stuff.

Next, keep your eyes open for Estate Sales. Depending on who is running the estate sale, items can be affordable or pricey. If pricey, decide if you want the items anyway or take your chances that the decorations will be there later. More expensive estate sales often have a half-price time in the afternoon or on the second day. Be sure to ask when their discount sale will take place.

Thrift shops are another place I frequent. You never know what you will find, so I enjoy the random hunt of the shopping experience. Some thrift shops put out holiday décor year round, while others just display it during prime Holiday shopping season. Check with your favorite thrift stores to find out their schedules. At the thrift shop I volunteer at, we have a “Christmas Corner” in one section of our shop. However, we also have a slew of Holiday-related donations we hold onto to display closer to December. At our shop, you can also let our staff know what you are looking for. We will keep our eyes out and contact you if we get something in that you might enjoy.

Thrift Shopping for Vintage Christmas ornaments
Thrift Shops are great places to find affordable vintage Christmas ornaments. Check back often, as the shops get tons of stuff in all Holiday season.

Thrift shops often get so much Holiday décor that they price it very affordably. They just want to keep the décor moving to make room for more. I have seen all sorts of great vintage ornaments, wreaths, garlands, you name it, come through our shop and the other thrift stores I frequent.

Finally, check out flea markets and antique shops. Sometimes vintage Christmas décor can be really marked up in price at such places. I’ve seen individual glass-blown Christmas bulbs from the 1950s marked as high as $8 a piece. Meanwhile, we may sell a whole box of similar ornaments for $2 at our thrift shop. Be ready to bargain if you see something you really want. Or if you see something really special, maybe it is worth the asking price.

Tin Christmas ornament from Mexico
Mexican tin Christmas ornament my mother-in-law collected during her travels.

Pick a Theme

Picking a theme for your Holiday décor or Christmas tree may help you figure out what to collect and how to utilize the vintage ornaments you do collect. For instance, for our Bohemian Christmas tree, I recently designed, I was inspired by two things. First, we inherited a set of beautiful hammered and hand-colored tin ornaments from Mexico. My mother-in-law purchased the ornaments in her travels, so they carry special energy for me. We also inherited three hand cut wood snowflake ornaments originally from Germany. I think they were circa 1940s or 1950s. I always admired the ornaments on my in-law’s Christmas tree.

German wood cut Vintage Christmas ornament
One of three vintage wood cut Christmas ornaments from Germany that we inherited.

From these ornaments, I knew I wanted to decorate the tree in bright, mostly primary colors. From there I dug out select ornaments from those that we inherited plus some ornaments in our own collection. I then made Christmas garlands and other boho ornaments to add to the tree. And this year, I’ve been keeping my eyes out while combing garage sales, rummage sales and thrift shops for additional ornaments that will enhance the boho décor look.

Keep An Open Mind

See something cool, but don’t know what you’ll do with it? That’s part of the fun of being eclectic and having boho style. Decide how drawn you are to the items and buy those that really call to you. You can always figure out what to do with the items later. Plus, if you didn’t pay much, you can always let go of the decorations later if you never find a use for them.

Holiday bird decor
Holiday bird fountain I found at a thrift shop for $4. We now also have a whole collection of winter birds we display on our bookshelves.

For instance, I grew up in the country where we were always surrounded by a multitude of songbirds. At our thrift shop, a winter, bird-themed fountain came in. When cleaned up (we dusted it off and then applied some spray glitter to it to freshen up the snow part of it), it was rather charming. I stared at it all season each time I came into work. When it was marked down to $4, I could no longer resist. That fountain became the base to a collection. Now we have a series of winter songbird collectibles that sit on our bookcase for the Holidays. (We also have a summer collection for the rest of the year).

So always be on the lookout for items you can build a collection around.

Vintage yule log and Pfaltzgraff Snow Bear collection
We combined a vintage yule log, gold greenery, and our Pfaltzgraff Snow Bear pottery collection on our antique buffet. In the background, you can see part of our miniature crystal vase collection that sits out year round.

Keep a Holiday Craft Stash

I always keep a stash of Holiday craft supplies and vintage components that I can visit if I am feeling crafty. Holiday craft supplies can often be found in garage sales. Look for unique components to make boho ornaments out of, such as beads, vintage cookie cutters, napkin rings, ribbon, fabric scraps and such. I also often purchase items 75-90% off around the New Year when the craft stores desperately want you to drag Holiday stuff out of their store at any price. That way I have supplies ready to go if I get random inspiration during the year.

Look Online for Inspiration

Going online to your favorite bohemian blogs and Pinterest are great ways to get ideas on how to use your vintage decorations to build a boho Christmas tree. There are wonderful DIY tutorials on how to make felt ornaments, mini dreamcatchers, yarn God’s eyes and more. You will also find great examples for upcycled ornaments from items like old cookie cutters, vintage lace and mini tart pans.

Tart tin DIY Christmas Ornaments
Keep a stash of Holiday craft supplies on hand to craft your own Christmas ornaments.

Add Some World Culture

Bohemian style is all about embracing world crafts and cultures. So finish your tree off with a couple of special ornaments from around the world. Cost Plus World Market is one of my favorite places to look for really unique ornaments. Amazon and Novica also sell a lot of Fair Trade ornaments and décor. World artisans are paid fair living wages to produce their unique crafts, so your money goes to a good cause.

Think Beyond the Tree

Some vintage Christmas ornaments are very fragile. Older glass ornaments tend to lose paint or shine over time. Others are too frail to put on the tree. Consider displaying these ornaments in a glass bowl or in a crystal ice bucket as a Holiday centerpiece.. You can also gently set ornaments into greenery to make a table or buffet centerpiece.

One of my absolute favorite vintage pieces is a 1960s Nativity scene. I found the nativity set in the attic at an estate sale for only $10! Each year, I love unwrapping the figurines and setting them up. It sparks wonderful memories. Our current nativity set is one size smaller than the set we had in our childhood. Our church also had a really large version of the same nativity. When my parents were first married, they collected a few figures each year, as they could afford them.

Collecting Vintage Christmas Ornaments_Nativity
I found this beautiful vintage Nativity set in an estate sale for only $10. Its one of the most cherished items I own because it reminds me of my childhood.

The nativity scene was one of the first items we were allowed to decorate the house with each year, as well as putting up our advent calendars and Santa cutouts on the windows and kitchen cabinets. This was followed by excessive amounts of cookie baking and being allowed to stay up to watch the classic Christmas cartoons like Rudolph. It’s funny how all the memories come floating back as I carefully put the nativity together.

Boho Christmas Tree with vintage ornaments

Collecting Vintage Christmas ornaments is fun. You will love your Holiday boho decor when you mix your vintage finds with the right amount of greenery, regular ornaments, and handmade ornaments.

Happy boho decorating!

Up next in our Bohemian Christmas series, check out how to Make Easy DIY Christmas Garlands with Felt and Wood Beads.

Vintage Christmas Ornaments

Share this:

  • Click to share on Facebook (Opens in new window) Facebook
  • Click to share on X (Opens in new window) X
  • Click to share on Pinterest (Opens in new window) Pinterest
  • Click to share on LinkedIn (Opens in new window) LinkedIn

Filed Under: Crafting, DIY, Home Decorating Tagged With: Christmas, Crafting, DIY, Holidays, Home Decor, Home Decorating, Upcycling, Vintage

Cool Ideas for DIY Bohemian Christmas Decorations

by BravelyBohemian

I decided it’s time to do something new with our Christmas tree. I like to change up the theme every few years. This time around, I’ve crafted various bohemian Christmas decorations and mixed them with vintage ornaments for a truly beautiful and festive effect.

Bohemian Christmas Ornaments DIY

To me, bohemian style extends into one of two directions- 1. Decorating in earthy, natural, found objects, or 2. Mixing colorful multicultural items into your own look. And if you are like me, I like to mix natural pieces with the multicultural for a truly unique look.

This series of blog posts gives you a tour of our boho Christmas tree. We went for the colorful, multicultural look. Each post will give ideas and directions on how you can create a similar bohemian Christmas look in your home.

Tart tin DIY Christmas Ornaments

Most of these bohemian Christmas decorations are fun and easy to make. If you feel like being social while you craft, invite some friends over to make the bohemian Christmas decorations with you. I recently participated in two crafting nights with friends. We had a ton of fun painting holiday canvases together. Then we made the alcohol ink painted glass ornaments to give as gifts. I love crafting with friends because we often gain creative ideas off of each other. Each of us has our own approach and style to creating.

Boho Christmas_DIY Christmas Garlands

So happy Holiday boho crafting! We hope these boho Christmas decor ideas inspire you:

*Tips on Collecting and Using Vintage Christmas Ornaments

*Easy DIY Christmas Garlands with Felt and Wood Beads

*Mixed Media Tart Tin Ornaments

*Felt Mandala Ornaments

*Bohemian Feather Ornaments

Share this:

  • Click to share on Facebook (Opens in new window) Facebook
  • Click to share on X (Opens in new window) X
  • Click to share on Pinterest (Opens in new window) Pinterest
  • Click to share on LinkedIn (Opens in new window) LinkedIn

Filed Under: Crafting, DIY, Home Decorating Tagged With: Christmas, Crafting, DIY, fiber crafts, Holidays, Home Decor, Home Decorating, Papercrafting

Make a Trendy Boho Tray with Tassel Trim

by BravelyBohemian

I love to decorate our home with unique, eclectic items from around the world. I especially like bohemian functional décor. Check out this boho tray I just made that uses turquoise wood stain, batik fabrics, silver faux leather handles and handmade tassels. Full directions are below!

Boho DIY Tray with Tassels

What You’ll Need:

Wood Picture Frame Tray (with Removable Backing) OR
Unfinished Wood Tray and Custom Glass Inset
Sandpaper
Paint or Colored Wood Stain
Clear Varnish
Up to 12 Different Cotton Batik Fabric Quarters
Scrap Paper or Tissue Paper for Pattern
Thread and Metallic Thread
Clear Caulk Sealant
2 Reels Faux Leather Cording
Glue Gun
4 Large Jewelry Clasps
8 Large Hole Silver Beads


I am a sucker for picking up amazing fabrics, though I have never been a quilter. Cotton batiks are one of my favorites. I love the random patterns and organic melding of colors in these dyed fabrics.

Batik Fabric Quarters_Boho Tray Project

Boho Tray Directions:

Start by lightly sanding the wood tray, wiping it down with a damp cloth, then staining it with the colored wood stain. I found the unfinished tray and wood stain at Michaels or you can order the stain from Amazon. I used the Plaid Folkart Ultra Dye, which comes in numerous fun, vibrant colors. I chose the turquoise shade which goes with the décor on our back screen porch.

You may want to add several layers of stain to your tray. It gets slightly darker each time you stain. You can also lightly sand in between coats to keep the wood tray smooth.

Turquoise stained Boho Tray

You can also choose to paint your tray instead of staining it. My tray was unfinished wood to begin with. However, painting might be easier if you are upcycling a photo tray.

Next I added 2 layers of clear varnish to the tray to seal in the wood stain and help protect the tray from wear and tear. Places like Lowe’s and Home Depot have additional varnish choices if you want to add a glossy, polished look to your wood.

The inner part my boho tray is a slightly odd size, so I had to cut glass to fit. I tried a few times to cut my own but decided after a few breaks to spend the $10 to have the professional at our local frame shop cut the glass for me. Set the glass aside. We will install it after the fabric part is inlaid into the tray.

***Note: If you cut your own or you have the glass custom cut for you, the edges are EXTREMELY sharp, so handle with care so you don’t cut yourself. ***

Calculating size of fabric squares for boho tray

Now you are ready to play with the batik fabrics that will line the inner part of your boho tray. Measure the interior of your tray and decide how you want your fabrics laid out. I decided to use 12 different batik squares in coordinating and contrasting colors. I used scrap paper to make a pattern and adjust the size of the squares to fit the space in the tray. For my tray, I cut 4-inch squares that included ¼ inch seam allowance on each side. So the final size of the completed squares, when sewn together, would be about 3 ½ inches each.

Add seam allowance to boho tray fabric squares

Next, use your pattern with seam allowance added to cut out your squares. Stitch them together, right side of fabrics together, joining them into a grid.

Once the squares are sewn together, iron all of the seam allowances flat. Then using a half cotton poly/half-metallic thread mix, top stitch your squares. On my fabric squares, I used black and silver metallic thread in a large machine zigzag stitch.

***Note: You can also use completely metallic thread. However, it can be finicky, so you may need to use a special needle in your sewing machine. Also, practice on scrap material. Here are some good tips for working with metallic thread.***

Iron once more and then you are ready to slide the batik fabric squares into the tray. I then carefully set the glass on top. If your fabric is sticking up on the sides beyond the height of the glass, carefully trim it. I had to take about 1/8 of an inch off the edges all the way around.

Boho Tray with batik fabric and glass insert

Once you have the fabric and glass in place, carefully seal the edges of the glass insert with clear silicone sealant. This will protect your fabric from dirt and water when you go to clean the tray, plus will also seal in the sharp edges of the glass overlay.

faux silver leather wrap on boho tray handles

Next, wrap the handles of the tray in the faux leather trim. Practice how you want it to look and then use a glue gun or jewelry glue to affix the trim. (It may or may not help to have a cat participate in this step).

Cat Helps with Art Project_Boho Tray wrapped handles

I decided to make tassels for the handles and attached them to the handles using large jewelry clasps. This allows them to be removed when cleaning the tray.

Closeup of removable tassels and faux leather handle wraps on boho tray

My tassels are made out of batik fabric scraps that are cut, rolled and held together by wide mouth silver beads. Here’s how to make the tassels:

Boho Batik Tassels:

Cut a desired length of batik.

Select and prep fabric to make tassels

On one half of the fabric’s length, make vertical cuts most of the way toward the middle of the fabric, 1/8 to ¼ inches wide. Continue until the end.

Turn the fabric and do the same to the other length so that each side of your fabric becomes fringed.

Fold the fabric in half, wrong sides together, right sides out. Roll the fabric into a fringed tube.

Rolling fabric into tassel for boho tray

Secure with the silver wide mouth bead.

completed fabric tassel for boho tray

Use your metallic thread and stitch through the top of the tassel above the bead, then loop through the jewelry clasp and knot the thread several times. Trim thread. Make your loops different lengths to give your tassels a cascade look. Afix to the handles of your tray.

Enjoy decorating and entertaining with your new boho tray! Your tray will make a great centerpiece when you throw your next bohemian themed party (with or without cats).

Inspired by this project? Check out more great bohemian DIY projects here. Happy Boho Crafting!

Final look at Boho Tray with glass and batik fabric inlay


Share this:

  • Click to share on Facebook (Opens in new window) Facebook
  • Click to share on X (Opens in new window) X
  • Click to share on Pinterest (Opens in new window) Pinterest
  • Click to share on LinkedIn (Opens in new window) LinkedIn

Filed Under: Crafting, DIY, Home Decorating Tagged With: Crafting, DIY, Home Decor

More Boho Valentine Cards to Make

by BravelyBohemian

February is the perfect time to express your love by making your own boho Valentine cards. There’s something extra special about receiving a handmade card from someone you love. The following are 6 bohemian-themed cards I made to inspire you to get your own boho crafting spirit in gear for Valentine’s Day.

DIY Boho Valentine Cards

Love Forever Boho Valentine Card
DIY Boho Valentine Cards_Love Forever

For this first boho Valentine, I found some great bohemian themed scrapbooking papers from Colorbok that easily mixed and matched. Colorbok makes a lot of coordinating double-sided papers. I used one printed paper for the background of the card, then added two vertical strips of paper in coordinating prints. I then rubber stamped the “Love” and “Forever” designs in black on white cardstock. I framed these with additional printed paper from the scrapbooking pack. After assembling the card, I topped it off with two gold printed on wood leaf embellishments. I really like how the muted papers look together combined with the boldness of the stamped images.

Love Grows Boho Valentine Card
Love_Grows_Boho_Valentine_Cards

One of my husband’s favorite bohemian hobbies is to take a nap under a tree, especially if that tree happens to be in a famous location such as a historical site. There’s something very romantic about hanging out under big trees. Even more so if there is a swing or two to sit on.

For this card, I used a pink polka dot scrapbook paper for the backing of the card. I stamped the tree in pigment ink on pale yellow cardstock and then embossed the image with dark blue embossing powder. I framed the image with matching blue cardstock behind the image, then attached it to the polka dots. I added a row of pre-cut floral and dotted paper pennants by Me and My Big Ideas, attaching them to the card with 3-dimensional tape. I also added jute twine knotted at each end to connect the pennants together. To complete the card, I added two tiny hearts to the swing.

This is one of my favorite boho Valentine cards. It makes me smile whenever I look at it.

You Are So Lovely Boho Valentine Card
DIY Boho Valentine Cards_You Are So Lovely

I picked up a scrapbook pack of paisley papers recently. Paisleys make me so happy. I wanted this card to be boldly bohemian. First, I split a piece of mostly black and white paisley paper in half, leaving the middle of the white cardstock showing. I found this great wood dream catcher to use as the centerpiece of the card. Next, I layered several red and hot pink silk flowers together with a silver brad and added the embellishment to the card. Finally, I added a sticker that says “You Are So Lovely” to the bottom left side.

I like the way this card came together. The bright flowers give the card almost a Mexican flare (maybe I was channeling Frida Kahlo since I saw a big exhibit of hers in Florida last year?) and I love all of the dimension in the card.

Very Boho Elephants Valentine Card
DIY Boho Valentine cards_Very_Boho_Elephants

Speaking of working in dimensions, this is my “go big or go home” bohemian valentine. I have a massive wall of ribbons and trims hanging in my art studio. I consider it my wall of possibilities because there are so many choices to use in my artwork. I have caught myself staring at recently acquired pompom trims sitting on the wall just waiting for the right opportunity to come along to use them.

I started the card by die cutting the elephants, flowers, and hearts. I found the elephant and flower scrapbooking dies at AliExpress.com and had them shipped in from China. It takes about a month for the scrapbook dies to arrive, so remember to place your orders well in advance of holiday crafting. I then cut all of the trims- 2 hot pink pom poms, 2 yellow pom poms, 2 turquoise pom poms, 2 bright green lace, and one hot pink grosgrain ribbon. Remember to cut your ribbons slightly longer than your card length. Arrange and adhere to the white cardstock, trimming the ribbons to fit. Lastly, I attached the die cuts. I used 3-dimensional tape on the elephants and hearts to give the card a little extra pizzazz.

The Very Boho Elephant valentine card is really bright and a bit crazy for my personality, but there’s also something fun and 1970s about it. It kind of reminds me of our childhood, when my sister decided to decorate her room in purple shag with pompom trim. It sounds hideous, but it was a pretty cool place to hang at the time.

Southwestern Hearts Boho Valentine Card
DIY Boho Valentine Cards_Southwestern_Hearts

I love this Southwestern-themed boho valentine card. Sizzix has come out with a leather jewelry cutting system called the Big Shot Jewelry Studio which I can’t wait to play with. I ordered the Sizzix Southwestern pattern Thinlets Die (#661510) to start.

I used the Sizzix die to cut two out in dark red paper and adhered those to white cardstock. I decorated the center area of the card with Southwestern- themed ribbon. I then found 2 chipboard hearts and embossed them with several layers of bright gold embossing powder. I saved the red punches that fell out when I ran the Southwestern die through my Sizzix Big Shot and added them to the fronts of the gold hearts. I then die cut the love arrow (another scrapbooking die I found at AliExpress.com) and attached it to a black arrow. I then assembled the pieces to the card.

My Heart Soars Boho Valentine Card
DIY boho Valentine cards_My Heart Soars

I am a sucker for picking up vintage-themed rubber stamps and love using them in boho valentine cards. Maybe it’s the steampunk gal in me? Hot air ballooning goes back as far as the 1700s and has always been a bohemian pastime- romantic and dangerous at the same time. So I had fun making this card, though I have yet to get the hubby up in a balloon. Maybe this year?

This card uses 2 different patterned scrapbook papers cut corner to corner. I used a blue polka dot combined with a red and white patterned paper. After attaching the papers to the cardstock, I then ran gold and black arrow ribbon down the angle of the card. Remember to cut your ribbons slightly longer than the card so you have room to adjust the ribbon, then trim it after adhering to the card. I then used Tim Holtz Fired Brick Red ink to stamp the balloon and cut it out. I found brick red paper to attach the balloon to and then cut out the background frame about ¼ inch larger than the balloon image.

Next, I designed the text, “My heart soars when I am with you” on Canva.com, saved as a .pdf and printed it out in black. (Oops! The first time, my printer fit the image to the page, so I ended up with my quote being sign-sized. Check your printer settings to make sure it prints out 2 x 2 ½ “ or whatever size you prefer.) I trimmed the quote and then mounted it on brick red paper. I attached everything to the card, making sure to give the hot air balloon a nice lilting look as though the wind is taking it on an adventure.

I hope these boho valentine cards inspire you to craft your own cards for the people you love. For further inspiration, click here to see the boho valentine cards I made last year.

Happy boho crafting!


Share this:

  • Click to share on Facebook (Opens in new window) Facebook
  • Click to share on X (Opens in new window) X
  • Click to share on Pinterest (Opens in new window) Pinterest
  • Click to share on LinkedIn (Opens in new window) LinkedIn

Filed Under: Crafting, DIY Tagged With: Crafting, DIY, Papercrafting, Valentine's Day

  • « Previous Page
  • 1
  • 2
  • 3
  • 4
  • 5
  • Next Page »

Meet Karen…

https://bravelybohemian.com/meet-karen
Wife, Crazy Cat Lady, Museum Junkie, History Buff, Entrepreneur, Crafter, Collector, Book Enthusiast, Project Runway Addict, Holistic Gypsy, Adventurer, Steampunker, Literal Tree Hugger and All-Around Fun Gal

Disclosure: This blog uses affiliate links, meaning we earn a small compensation when you purchase from our links. Your purchase helps keep the blog running, plus the cats fed and off the desk long enough to deliver you new content.

Get Bravely Bohemian!

Never miss a new post or opportunity to be more Bravely Bohemian!! We’ll even send you some FREE Boho goodies! Subcribe Here:

Connect with Us!

  • View BravelyBohemian’s profile on Facebook
  • View BravelyBohemian’s profile on Twitter
  • View BravelyBohemian’s profile on Pinterest
  • View karen-mcmahon-4a92a411b’s profile on LinkedIn

Trending Boho Topics

Shop Our Favorite Brands:

300x300 general
Plow & Hearth
CLICK.BUY. CREATE. Shop Michaels.com today!

Copyright © 2025 · Lifestyle Pro Theme on Genesis Framework · WordPress · Log in


Loading Comments...