Bravely Bohemian Favorites

Breathe Deep, Be Brave

  • Fashion
    • Trends
    • Wedding
    • Steampunk
  • Adventuring
    • History
  • DIY
    • Home Decorating
    • Crafting
    • Cooking
  • Spirit
  • Wellness
    • Pets
  • Reviews
    • Books
    • Media
    • Products
  • Shop
    • Gift Guides
  • About
  • Join Us!
  • Contact Us!

Lessons from our Christmas Photo Shoot

by BravelyBohemian


I usually make handmade cards for the Holidays but one year we decided to change things up with a Christmas photo shoot. Keep scrolling to see how ours turned out.

Christmas photo shoot, serious photo in  Christmas dinosaur sweaters


Anyone who knows us will agree we can be a bit quirky. And when we get a goofy idea, we run with it! Well, I happened onto Amazon one day and stumbled across super funny Christmas sweaters. If you glanced quickly, the sweaters had a nice traditional Fair Aisle style, just in red and green. But if you looked closely, instead of trees, there were rows of tyrannosaurus rexes staring at you. I am rarely impulsive, but I had to have them! The Christmas sweaters were hideous and hilarious all at the same time. And this was before the craze started where everyone buys ugly Christmas sweaters and hosts ugly Christmas sweater parties. (You can see Amazon’s current selection of dinosaur themed Christmas sweaters here).


When the box arrived, I excitedly called Al to come help me unpack my surprise. He opened the box and thought, “Oh, no! What is she up to now?” Of course, there were two sweaters, matching. He also then gave me “the look!” He knows I have a total pet peeve about couples matching their clothes. It was such a thing in the 1990s and 2000s for people to travel in matching jogging suits. We’d see older couples in the airport all the time. It always made me snicker.

Why a Christmas Card Photo Shoot?


I then told Al my plan to hire a photographer. We were going to do a Christmas photo shoot. I needed to take professional photos for this blog anyway, so it was the perfect time to add in a few Christmas photos too. I figured we’d do a mix of serious, normal people photos and then do an outfit swap out and do fun photos in the dinosaur Christmas sweaters.

Dinosaur Christmas photo shoot with Christmas dinosaur sweaters


We had an awesome Christmas photo shoot. Here are some of the lessons we learned so you can plan your own:

1. Brainstorm Ideas


We quickly came up with the hair brained idea to run with the dinosaur theme. We decided on Jurassic Park type photos. So that meant doing our Christmas photo shoot outside and then using Photoshop to add in a few hungry dinosaurs to our final pics.

2. Pick the Right Location


We chose a local park for our photo shoot. There were open spaces, beautiful, wooded areas and benches and rustic buildings located throughout the park. This gave us a variety of backdrops for both our serious photos and our funny photos.

3. Get the Right Vibe


What personality do you want your photos to convey? Serious? Warm? Cheery? Funny? Ironic? Loving? The photo shoot itself usually goes very quickly, so having a sense of what you are going for ahead of time is very helpful. We went with a funny “running from dinosaurs” theme but also thought it would be entertaining to do completely serious photos in our dinosaur sweaters and see who actually noticed them.

Christmas dinosaur sweater photo shoot serious photo

4. Discuss Your Vision Ahead of Time With Your Photographer


It helps to chat about what you want out of your Christmas photo shoot ahead of time. Most photographers are highly creative and often have additional ideas for your shoot. They may also have props they can bring to add to the charm of the photos. A good photographer also serves as a director, helping to set up the shots and posing you in a way that will capture your best images.

5. Have Fun!


And most importantly, laugh and have fun during your photo shoot. Even if you are doing a serious Christmas photo shoot, people tend to look stiff if they have been smiling for too many photos in a row. Rule of thumb, mix it up! Take a random silly photo in the middle of the serious photo shoot. It gets everyone laughing and relaxing again so that the next set of photos look more natural.

Having fun on the set of our dinosaur Christmas photo shoot

Having more fun on set of our dinosaur sweater Christmas photo shoot

Of note the Christmas card we ended up sending our friends and family is still talked about to this day:

Final Christmas card image from our Dinosaur Christmas photo shoot

A Christmas photo shoot can be a lot of fun no matter what type of photo you are aiming for. A touch of planning and a few fun ideas make it a very memorable experience.

You will find additional photos from this Christmas photo shoot with us in normal clothes on the About page.

Share this:

  • Click to share on Facebook (Opens in new window) Facebook
  • Click to share on X (Opens in new window) X
  • Click to share on Pinterest (Opens in new window) Pinterest
  • Click to share on LinkedIn (Opens in new window) LinkedIn

Filed Under: Adventuring, Crafting, DIY, Spirit Tagged With: Adventuring, Christmas, DIY, Holidays

Make Bohemian Feather Ornaments

by BravelyBohemian

As part of our boho Christmas blog series, I recently made these bohemian feather ornaments.

Clear boho feather ornaments

Do you see the clear ornaments in the store and wonder what to do with them? Some people fill them, while others paint the interiors or exteriors with alcohol inks or crayon wax. If you look on Pinterest, there are many suggestions.

I like the bohemian feather ornaments I created because they are simple to make and give a festive vibe to our other bohemian Holiday décor.

Here are the directions for the bohemian feather ornaments.

You will need:

*Clear glass or plastic ornaments
*Small white feathers
*Brightly dyed small pheasant feathers
*White and green or white and blue fine glitter
*Birch cones
*Red, green and turquoise hemp thread, thin enough to string your beads
*Multi-colored glass beads
*Beading needle
*Craft tweezers or long blunt needle
*Scissors

Directions:

1. Carefully remove the tops from your clear ornaments and set aside.

2. Start by gently adding a white feather or two into the interior of each ornament. To keep the feathers in good repair, slide the bottom of the feathers into the ornament first, so the tops are the last to go in.

3. Next, add a few colored feathers to the ornaments. Use your craft tweezers or long blunt needle (such as a tapestry needle) to carefully arrange the feathers on the inside of your ornaments.

4. Now tap some glitter into the bottom of each ornament. I used about a ½ teaspoon to 1 teaspoon of glitter for each ornament.

5. On top of the glitter, drop 2 to 3 birch cones into each ornament.

6. Use your craft tweezers or long blunt needle to do the final arrangement of the feathers and cones.

7. Gently squeeze the tops back onto your feather ornaments.

Boho feather & pinecone ornaments

8. Next, cut 5 to 6 inches of colored hemp thread. I cut two different colors for each ornament.

9. Tie a knot on one end of each strand of hemp thread.

10. Thread your beading needle, followed by 6 to 8 colored glass beads onto each hemp thread. Then knot the other end of the hemp thread.

11. Gather 2 beaded hemp threads together and hold in the middle so an equal amount of beads slide to each end of your threads.

12. Wrap and tie the centers of the beaded hemp threads around the tops of your feather ornaments, so that the threads and beads drape like tassels. Trim the ends of the hemp.

Clear boho feather ornaments

*Of note, you may want to store your feather ornaments upright in the off-season, so the interiors stay where you want them and the glitter doesn’t spill out.

Enjoy your wonderful, colorful bohemian feather ornaments.

For a full list of our Boho Christmas series projects, click here.

Happy Boho crafting!


Share this:

  • Click to share on Facebook (Opens in new window) Facebook
  • Click to share on X (Opens in new window) X
  • Click to share on Pinterest (Opens in new window) Pinterest
  • Click to share on LinkedIn (Opens in new window) LinkedIn

Filed Under: Crafting, DIY, Home Decorating Tagged With: Christmas, Crafting, DIY, Holidays, Home Decorating

Felt Mandala Ornaments

by BravelyBohemian

After recently making 36 feet of festive felt garlands for our boho Christmas tree, I found myself thinking about other Holiday projects I could make out of felt. Check out these easy-to-make felt mandala ornaments.

DIY Felt Mandala ornaments with tassels

I love these felt mandala ornaments because they are bright, simple and have fun tassels made of crochet thread.

Supplies:

*Precut felt flower mandalas in various colors (mine are from Studio g) OR thin craft felt squares, Sizzix machine and a simple mandala cutting die
*Indian shisha mirrors
*Mini gems
*Embroidery or crochet thread in various colors
*Clear fabric glue
*Cardboard scrap
*Needle
*Scissors

5 mandala felt ornaments

Directions:

1. Prepare your felt mandalas by deciding how you want to decorate them. My mandalas were purchased at the craft store precut. However, you can also make your own with the use of a Sizzix machine and a simple scrapbooking cutting die. Lightweight felt seems to work best. Also, make sure to select a simple mandala pattern for your cutting die. Dies with a lot of intricacies can cause some frustration, so be sure to experiment with your machine and cutting die on scrap felt first.

2. Stitch an Indian shisha mirror to the center of each of your felt mandala ornaments. Shisha mirrors can be affordably purchased on Amazon, eBay or on Etsy.

3. Attach the mini gems as you see fit to highlight the edges of a felt mandalas. You can use the sticker backed mini gems from the scrapbooking aisle of your craft store. However, these may not hold up for the long run. Instead, you may want to use clear fabric glue to glue on the gemstones.

closeup of felt mandala ornaments

4. Use colorful embroidery or crochet thread and a scrap of cardboard to make tassels. Directions on how to make the tassels can be found here. My tassels came out about 4 ½ inches each when completed. Or you can buy pre-made tassels.

5. String a thread through the top of each tassel. Stitch the tassel to the felt mandala ornament. Trim the excess threads.

6. Take an additional piece of thread and stitch through the top of each of your mandalas. Create a loop and then tie the ends several times. This will be used to hang the ornament on your Christmas tree.

And that’s it! Enjoy your beautiful felt mandala Christmas ornaments.

Happy boho crafting! Click for the next article in our boho Christmas series where we’ll make Bohemian Feather Ornaments.

Pink & Blue mandala Christmas ornament

Share this:

  • Click to share on Facebook (Opens in new window) Facebook
  • Click to share on X (Opens in new window) X
  • Click to share on Pinterest (Opens in new window) Pinterest
  • Click to share on LinkedIn (Opens in new window) LinkedIn

Filed Under: Crafting, DIY, Home Decorating Tagged With: Christmas, Crafting, DIY, fiber crafts, Holidays, Home Decorating

Make Mixed Media Tart Tin Ornaments

by BravelyBohemian

As mentioned in a previous post, I love to collect found objects and then figure out later how to craft with them. While poking around a thrift shop last year, I picked up six vintage mini tart tins. I knew immediately that I wanted to make mixed media tart tin ornaments for our boho themed Christmas tree.

boho tart tin ornament with Shisha mirrors

The tart tins are made of shiny aluminum so I knew they would reflect the lights on our tree.

Mini tart pans come in a variety of shapes and sizes, perfect for making ornaments. If you can’t find vintage tins, you can purchase new ones at an affordable price on Amazon or at a restaurant supply store. My mixed media tart tin ornaments are approximately 3 inches across.

Here is how I made our tart tin ornaments:

Supplies:
*Mini Tart Tins
*Imported handmade paper with metallic elements (such as Thai batik paper scraps)
*Gold metallic trim
*Mini pompoms
*Microbeads
*Mini gems
*Shisha mirrors
*Gold metallic thread or string
*Craft glue that dries clear
*Scrapbooking punches or Sizzix machine and metal dies
*Hammer and awl or electric drill or Dremel tool
*Self-healing cutting mat
*Scissors
*Scrap of cardboard


Directions:

1. Start by punching small holes into the top edge and bottom edge of each tart tin using your hammer and awl, electric drill or Dremel tool. Do this over a self-healing cutting mat so you don’t scrape your work surface. The holes should be big enough to slide the ends of the gold thread or string through and knot in step 9.

2. Lay out the general designs you want for each of the ornaments.

Mixed Media Tart Tin ornament designs

3. Start with the outer rim of your tart tins. For two of my ornaments, I glued gold trim along the fluted edges. The next two are coated in multi-colored microbeads. The last two are decorated with red and green pompoms. Set them aside to dry.

4. Next, use your scrapbooking punches to cut designs out of the imported Thai papers. You can also use a Sizzix cutting machine and your favorite metal dies for this step. For my ornaments, I cut circle, paisley, and bird patterns to fit into the center of the tart tins.

5. Gently glue in the paper designs, then if you like, decorate the designs with metallic gems.

6. For the last two ornaments, decorate with a variety of colorful Indian shisha mirrors. You can usually purchase shisha mirrors on Amazon, Etsy or eBay. Affix metallic gems. Let everything dry.

7. String the ends of your gold thread through the top hole of each tin and knot several times, making a loop to hang the ornaments on your tree.

8. Use your scrap of cardboard to make tassels out of the gold thread or string. I made my tassels about 4 inches long. Here are directions on how to make the tassels. You can also purchase premade tassels if you don’t want to make them.

Mixed Media tart tin ornaments with tassels

9. String a loop of thread through the top of each tassel. Feed both ends of the string up through the bottom hole of the tart tin. Pull the tassel up to the desired length, and then knot the ends of your threads several times. Clip the excess threads.

Your mixed media tart tin ornaments are ready to be hung on your Christmas tree.

boho Christmas_tart tin ornaments with Bird

Happy boho crafting! To continue in our Boho Christmas series, click here for directions to make Felt Mandala Ornaments.


Share this:

  • Click to share on Facebook (Opens in new window) Facebook
  • Click to share on X (Opens in new window) X
  • Click to share on Pinterest (Opens in new window) Pinterest
  • Click to share on LinkedIn (Opens in new window) LinkedIn

Filed Under: Crafting, DIY, Home Decorating Tagged With: Christmas, Crafting, DIY, Holidays, Home Decor, Home Decorating, Papercrafting

Make Easy DIY Christmas Garlands with Felt and Wood Beads

by BravelyBohemian

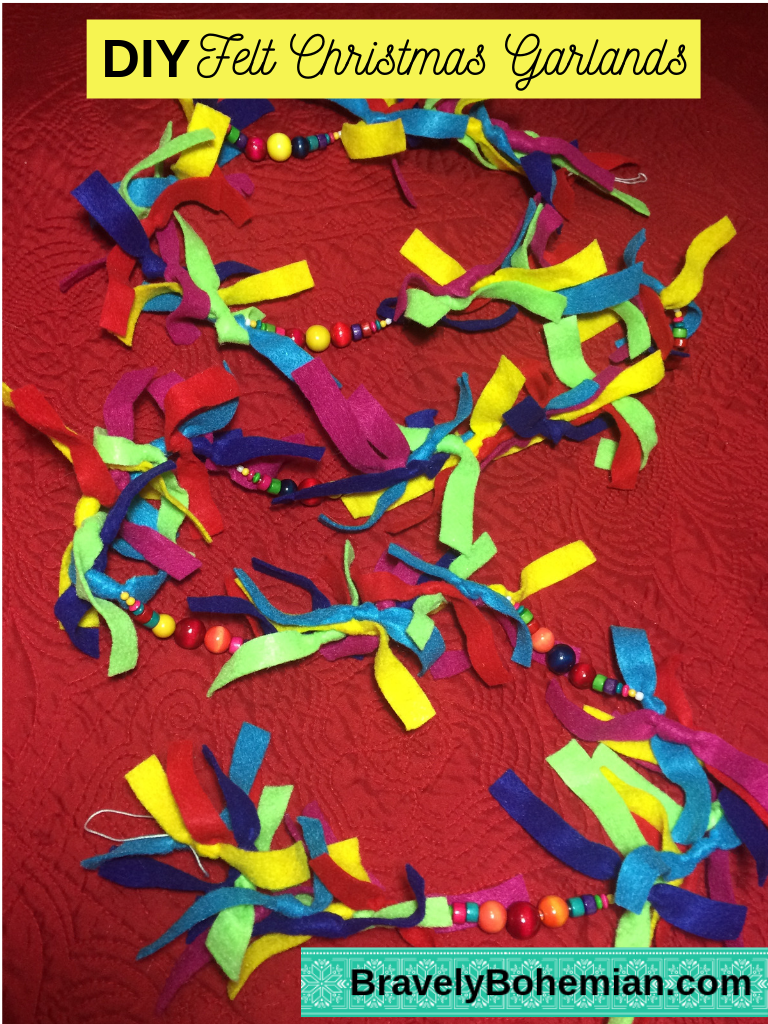
Today I am going to share with you how to make these easy DIY Christmas garlands.

Felt Christmas Garlands with Beads DIY

The garlands are made out of strips of felt and wood beads. I made 7 strands to string on our Christmas tree, each 6 feet long. To tie the look together, you may want to make additional garlands to add to your tabletops and banisters. Intertwining with greens and white lights make your DIY Christmas garlands extra festive.

Every few years I pick a new theme for our Christmas tree. I decided our tree had to be bohemian and colorful. As you know from my previous post, I selected some vintage ornaments we inherited from my mother-in-law and mixed them with handmade ornaments, plus some store bought ornaments. However, I really wanted to pull the look all together. The DIY Christmas garlands created the perfect balance on our tree.

Boho Christmas_DIY Christmas Garlands

Here’s what you need to make your own DIY Christmas garlands.

Supplies:

*String or multi-colored baker’s twine, 6 feet plus 4 inches per garland
*Felt in 6 colors, ½ yard each
*Colored wood beads in assorted sizes and colors
*Beading needle
*Sharp fabric scissors


Directions:

1. For each garland, cut your string or baker’s twine approximately 6 feet, 4 inches. Make a loop on the one end of your string and then tie a double knot. You will want approximately a 2-inch loop on the end of your garland.

2. Next, cut strips out of your 6 colors of felt. I made my felt strips approximately ¾ inch wide by 6 inches.

3. Now simply overhand knot the felt strips onto your string, alternating colors. In my garlands, I tied the 6 colors on in random order, then another 6 in random order for a total of 12 felt strips.

4. To break up the felt sections, add about 3 inches of assorted wood beads to the garland. Use a large-eye needle if necessary to string the beads.

Bohemian Christmas DIY Christmas Garlands

*I found colorful beads to match my colors of felt. However, you can also buy unfinished wood beads, and then paint them with acrylic paints.

5. Continue alternately tying sections of felt strips and beads until you get close to the end of your garland, ending with a section of felt strips.

6. To complete the garland, tie the remaining open end of your garland string into a loop and knot it as you did in Step One.

Have fun decorating with your festive DIY Christmas garlands! Click here to see our next boho Christmas decorating project, Mixed Media Tart Tin Ornaments.


Share this:

  • Click to share on Facebook (Opens in new window) Facebook
  • Click to share on X (Opens in new window) X
  • Click to share on Pinterest (Opens in new window) Pinterest
  • Click to share on LinkedIn (Opens in new window) LinkedIn

Filed Under: Crafting, DIY, Home Decorating Tagged With: Christmas, Crafting, DIY, Felt, fiber crafts, Holidays, Home Decor, Home Decorating

  • 1
  • 2
  • 3
  • Next Page »

Meet Karen…

https://bravelybohemian.com/meet-karen
Wife, Crazy Cat Lady, Museum Junkie, History Buff, Entrepreneur, Crafter, Collector, Book Enthusiast, Project Runway Addict, Holistic Gypsy, Adventurer, Steampunker, Literal Tree Hugger and All-Around Fun Gal

Disclosure: This blog uses affiliate links, meaning we earn a small compensation when you purchase from our links. Your purchase helps keep the blog running, plus the cats fed and off the desk long enough to deliver you new content.

Get Bravely Bohemian!

Never miss a new post or opportunity to be more Bravely Bohemian!! We’ll even send you some FREE Boho goodies! Subcribe Here:

Connect with Us!

  • View BravelyBohemian’s profile on Facebook
  • View BravelyBohemian’s profile on Twitter
  • View BravelyBohemian’s profile on Pinterest
  • View karen-mcmahon-4a92a411b’s profile on LinkedIn

Trending Boho Topics

Shop Our Favorite Brands:

300x300 general
Plow & Hearth
CLICK.BUY. CREATE. Shop Michaels.com today!

Copyright © 2025 · Lifestyle Pro Theme on Genesis Framework · WordPress · Log in


Loading Comments...